

Introduction to Spicy Shrimp Sushi Stacks
Hey there, fellow food lovers! If you’re anything like me, you know that life can get pretty hectic, especially when juggling family, work, and everything in between. That’s why I’m excited to share my recipe for Spicy Shrimp Sushi Stacks—a delightful treat that’s not only quick to whip up but also a feast for the eyes and the taste buds! Imagine layers of roasted shrimp, fluffy sushi rice, and fresh veggies, all stacked beautifully. It’s the perfect dish to impress your loved ones or simply enjoy on a busy weeknight. Let’s dive into this delicious adventure together!
Why You’ll Love This Spicy Shrimp Sushi Stacks
Let’s be honest—who doesn’t love a meal that’s both easy and delicious? These Spicy Shrimp Sushi Stacks are a breeze to make, taking just about 50 minutes from start to finish. Plus, they’re packed with flavor and can be customized to suit your family’s tastes. Whether you’re looking to impress guests or just want a fun dinner idea, these stacks are sure to become a favorite in your kitchen!
Ingredients for Spicy Shrimp Sushi Stacks
Now, let’s gather our ingredients for these scrumptious Spicy Shrimp Sushi Stacks. Each component plays a vital role in creating that delightful flavor and texture we all crave. Here’s what you’ll need:
- Large shrimp: Fresh or frozen, these are the stars of the show! They bring a sweet, briny flavor that pairs perfectly with the spices.
- Olive oil: A splash of this liquid gold helps to keep the shrimp moist while roasting and adds a lovely richness.
- Garlic powder: This adds a savory depth to the shrimp. If you’re a garlic lover, feel free to sprinkle a bit more!
- Smoked paprika: This spice gives a warm, smoky flavor that elevates the dish. It’s like a cozy hug for your taste buds!
- Cayenne pepper: For those who enjoy a kick, this spice brings the heat. Adjust it to your liking—more for spice lovers, less for the faint of heart.
- Sushi rice: The foundation of our stacks! This short-grain rice becomes sticky when cooked, making it perfect for layering.
- Water: Essential for cooking the rice to that perfect fluffy texture.
- Rice vinegar: This tangy liquid adds a delightful zing to the rice, balancing the flavors beautifully.
- Granulated sugar: Just a touch of sweetness helps to mellow the acidity of the vinegar, creating a harmonious flavor.
- Sea salt: A pinch of salt enhances all the flavors, making each bite pop!
- Ripe avocado: Creamy and rich, avocado adds a luxurious texture and a fresh taste to the stacks.
- Cucumber: Thinly sliced, it brings a refreshing crunch that contrasts beautifully with the other ingredients.
- Nori: These seaweed sheets add a hint of umami and are perfect for holding everything together. You can also use lettuce leaves for a lighter option!
- Soy sauce: A classic dipping sauce that complements the flavors of the shrimp and rice. You can opt for low-sodium if you’re watching your salt intake.
- Sriracha: Drizzle this spicy sauce on top for an extra kick! It’s a fun way to customize the heat level.
- Sesame seeds: These tiny seeds add a nutty flavor and a lovely crunch, making your stacks look even more appealing.
- Chopped green onions: A sprinkle of these adds a fresh, oniony bite that brightens up the dish.
For exact measurements, you can find them at the bottom of the article, ready for printing. Feel free to get creative with your ingredients! You can swap out the shrimp for crab or tofu, or add in your favorite veggies. The beauty of these Spicy Shrimp Sushi Stacks is that they’re as versatile as they are delicious!
How to Make Spicy Shrimp Sushi Stacks
Now that we have our ingredients ready, let’s dive into the fun part—making these Spicy Shrimp Sushi Stacks! Follow these simple steps, and you’ll have a beautiful dish that’s sure to impress.
Step 1: Preheat the Oven
First things first, let’s get that oven preheating to 400°F. Preheating is crucial because it ensures even cooking. If you toss your shrimp in a cold oven, they might end up unevenly cooked—nobody wants rubbery shrimp, right? So, let that oven warm up while you prepare the shrimp!
Step 2: Season the Shrimp
In a mixing bowl, combine your peeled and deveined shrimp with olive oil, garlic powder, smoked paprika, and cayenne pepper. Give it a good toss until every shrimp is coated in those flavorful spices. This step is where the magic happens! The seasoning not only enhances the shrimp’s natural sweetness but also adds layers of flavor that will make your taste buds dance.
Step 3: Roast the Shrimp
Spread the seasoned shrimp on a baking sheet in a single layer. Pop them in the preheated oven and roast for about 8-10 minutes. Keep an eye on them! You’ll know they’re done when they turn pink and opaque. If you’re unsure, a quick poke with a fork should reveal a firm texture. Overcooked shrimp can be tough, so aim for that perfect tender bite!
Step 4: Prepare the Sushi Rice
While the shrimp are roasting, it’s time to tackle the sushi rice. Rinse 1 cup of sushi rice under cold water until the water runs clear. This step removes excess starch, which is key for achieving that perfect sticky texture. In a medium saucepan, combine the rinsed rice with 1 ¼ cups of water and bring it to a boil. Once boiling, reduce the heat to low, cover, and let it simmer for 18-20 minutes. After cooking, let it sit covered for an additional 10 minutes. This resting period allows the rice to finish cooking and become fluffy!
Step 5: Mix the Vinegar Solution
In a small bowl, whisk together ¼ cup of rice vinegar, 2 tablespoons of granulated sugar, and 1 teaspoon of sea salt until the sugar dissolves. This vinegar mixture is essential for flavoring the rice. It adds a tangy sweetness that balances the richness of the shrimp and avocado. Once your rice is done resting, gently fold this mixture into the rice, ensuring it’s evenly distributed. Let the rice cool slightly before assembling your stacks.
Step 6: Assemble the Sushi Stacks
Now comes the fun part—layering! Grab a round mold or a small bowl. Start by placing a layer of sushi rice at the bottom, pressing it down lightly to create a solid base. Next, add a layer of sliced avocado, followed by a layer of your roasted shrimp. Top it off with cucumber slices for that refreshing crunch. Repeat these layers until your mold is filled, finishing with a final layer of sushi rice. Carefully lift the mold to reveal your beautiful sushi tower. It’s like a work of art!
Step 7: Garnish and Serve
Before serving, drizzle your stacks with Sriracha for that extra kick. Sprinkle sesame seeds and chopped green onions on top for a pop of color and flavor. Serve with soy sauce on the side for dipping. These Spicy Shrimp Sushi Stacks are not just a treat for the taste buds; they’re a feast for the eyes too! Enjoy your creation with family or friends, and watch them be amazed at your culinary skills!
Tips for Success
- Always preheat your oven for even cooking—this makes a world of difference!
- Don’t skip rinsing the sushi rice; it’s key for that perfect sticky texture.
- Feel free to customize your stacks with different proteins or veggies based on what you have on hand.
- Let the rice cool slightly before assembling to avoid mushy layers.
- Use a sharp knife for clean cuts when slicing your avocado and cucumber.
Equipment Needed
- Baking sheet: A standard one works great, but a rimmed sheet can help catch any juices.
- Mixing bowls: Use any size you have; just make sure they’re big enough for tossing ingredients.
- Medium saucepan: Essential for cooking the sushi rice; a pot with a lid is perfect.
- Round mold or small bowl: This helps shape your sushi stacks; a measuring cup can work in a pinch!
- Sharp knife: For slicing veggies and shrimp; a good chef’s knife makes all the difference.
Variations
- Protein Swap: If shrimp isn’t your thing, try using crab meat, cooked chicken, or even tofu for a vegetarian option. Each will bring its own unique flavor!
- Veggie Boost: Add more veggies like bell peppers, shredded carrots, or radishes for extra crunch and color. You can even toss in some edamame for a protein punch!
- Spice Level: Adjust the heat by using less cayenne pepper or adding more Sriracha. You can also experiment with different hot sauces to find your perfect balance.
- Gluten-Free Option: Ensure your soy sauce is gluten-free, or swap it out for tamari. This way, everyone can enjoy these delicious stacks!
- Rice Alternatives: For a lower-carb option, try using cauliflower rice instead of sushi rice. It’s a great way to sneak in some extra veggies!
Serving Suggestions
- Side Dishes: Pair your Spicy Shrimp Sushi Stacks with a light miso soup or a refreshing seaweed salad for a complete meal.
- Drinks: Enjoy with a chilled glass of white wine or a light, fruity sake to complement the flavors.
- Presentation: Serve on a beautiful platter, garnished with extra sesame seeds and green onions for a stunning visual appeal!
FAQs about Spicy Shrimp Sushi Stacks
Got questions about these delicious Spicy Shrimp Sushi Stacks? You’re not alone! Here are some common queries I’ve encountered, along with my answers to help you navigate this tasty recipe.
1. Can I make Spicy Shrimp Sushi Stacks ahead of time?
Absolutely! You can prepare the shrimp and sushi rice in advance. Just store them separately in the fridge. When you’re ready to serve, assemble the stacks fresh for the best texture. This way, you can enjoy a quick meal without the last-minute rush!
2. What can I substitute for shrimp in this recipe?
If shrimp isn’t your thing, no worries! You can easily swap it out for crab meat, cooked chicken, or even tofu for a vegetarian option. Each alternative will bring its own unique flavor to your Spicy Shrimp Sushi Stacks!
3. How do I store leftovers?
To keep your stacks fresh, store any leftovers in an airtight container in the fridge. They’re best enjoyed within a day or two. Just remember that the rice may lose some of its texture, but the flavors will still be delightful!
4. Can I use brown rice instead of sushi rice?
While sushi rice is ideal for that sticky texture, you can use brown rice if you prefer a healthier option. Just keep in mind that the cooking time will be longer, and the texture will be different. Your Spicy Shrimp Sushi Stacks will still be delicious!
5. How spicy are these stacks?
The spice level is totally up to you! The cayenne pepper adds a nice kick, but you can adjust it to your taste. If you’re sensitive to heat, feel free to use less or skip it altogether. The Sriracha drizzle on top is also optional, so you can customize the heat to suit your family’s preferences!
Final Thoughts
Creating these Spicy Shrimp Sushi Stacks is more than just cooking; it’s about bringing joy to your table and sharing delightful moments with loved ones. The vibrant layers of shrimp, rice, and fresh veggies not only look stunning but also taste incredible. Whether it’s a busy weeknight or a special gathering, these stacks are sure to impress. Plus, the versatility of the recipe means you can adapt it to suit your family’s tastes. So roll up your sleeves, get creative, and enjoy the delicious satisfaction that comes from making this beautiful dish!
Print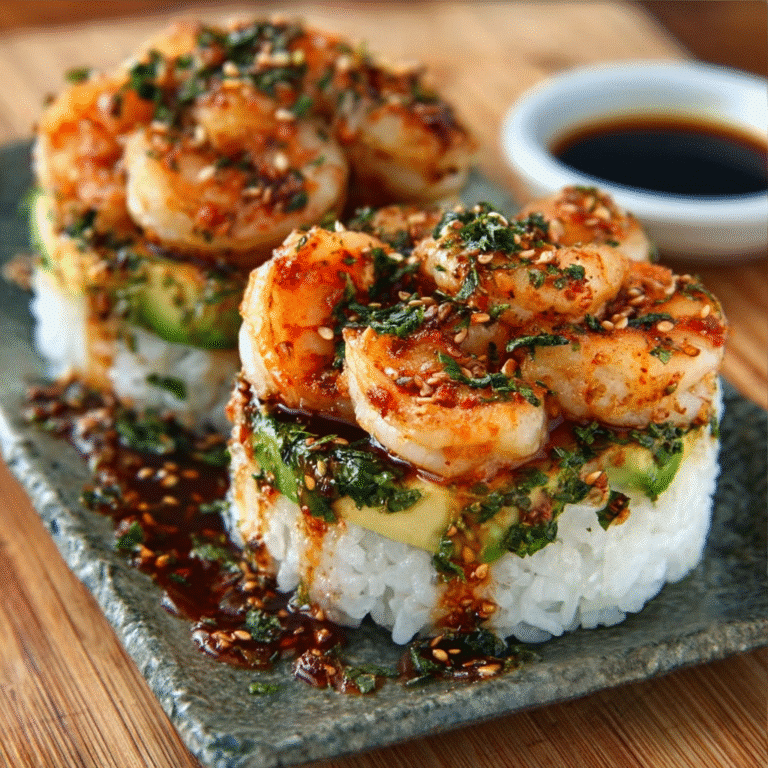
Spicy Shrimp Sushi Stacks are a delightful treat!
Spicy Shrimp Sushi Stacks are a delightful treat that combines the flavors of roasted shrimp, sushi rice, and fresh vegetables in a beautiful layered presentation.
- Total Time: 50 minutes
- Yield: 4 servings 1x
Ingredients
- 1 pound large shrimp, peeled and deveined
- 1 tablespoon olive oil
- 1 teaspoon garlic powder
- 1 teaspoon smoked paprika
- 1 teaspoon cayenne pepper (adjust to taste)
- 1 cup sushi rice
- 1 ¼ cups water
- ¼ cup rice vinegar
- 2 tablespoons granulated sugar
- 1 teaspoon sea salt
- 1 ripe avocado, sliced
- 1 cucumber, thinly sliced
- 4 sheets nori, cut into quarters
- Soy sauce, for dipping
- Sriracha, for drizzling
- Sesame seeds, for garnish
- Chopped green onions, for garnish
Instructions
- Preheat your oven to 400°F.
- In a mixing bowl, combine the shrimp with olive oil, garlic powder, smoked paprika, and cayenne pepper.
- Spread the seasoned shrimp on a baking sheet and roast in the oven for about 8-10 minutes, or until they turn pink and are cooked through.
- Once done, take them out and set aside to cool.
- While the shrimp are baking, rinse the sushi rice under cold water until the water runs clear.
- In a medium saucepan, combine the rinsed rice with water and bring to a boil.
- Once boiling, reduce the heat to low, cover, and let it simmer for 18-20 minutes until the rice is tender and the water has been absorbed.
- After cooking, remove from heat and let it sit covered for an additional 10 minutes.
- In a separate small bowl, whisk together the rice vinegar, sugar, and sea salt until the sugar is fully dissolved.
- Gently fold this mixture into the cooked sushi rice, ensuring it is evenly distributed. Allow the rice to cool down slightly.
- To create the sushi towers, use a round mold or a small bowl. Start by placing a layer of sushi rice at the bottom, pressing it down lightly.
- Add a layer of sliced avocado, followed by a layer of the roasted shrimp, and then top with cucumber slices.
- Repeat these layers until the mold is filled, finishing with a final layer of sushi rice.
- Carefully lift the mold to reveal your sushi tower. Repeat the process with the remaining ingredients to create additional towers.
- Before serving, drizzle the towers with Sriracha and sprinkle sesame seeds and chopped green onions on top. Serve with soy sauce on the side for dipping.
Notes
- Adjust the amount of cayenne pepper based on your spice preference.
- Make sure to let the sushi rice cool slightly before assembling the towers.
- These stacks can be customized with other vegetables or proteins as desired.
- Prep Time: 20 minutes
- Cook Time: 30 minutes
- Category: Appetizer
- Method: Baking
- Cuisine: Japanese
- Diet: Gluten Free
Nutrition
- Serving Size: 1 stack
- Calories: 350
- Sugar: 3g
- Sodium: 600mg
- Fat: 10g
- Saturated Fat: 1g
- Unsaturated Fat: 9g
- Trans Fat: 0g
- Carbohydrates: 50g
- Fiber: 3g
- Protein: 20g
- Cholesterol: 150mg