
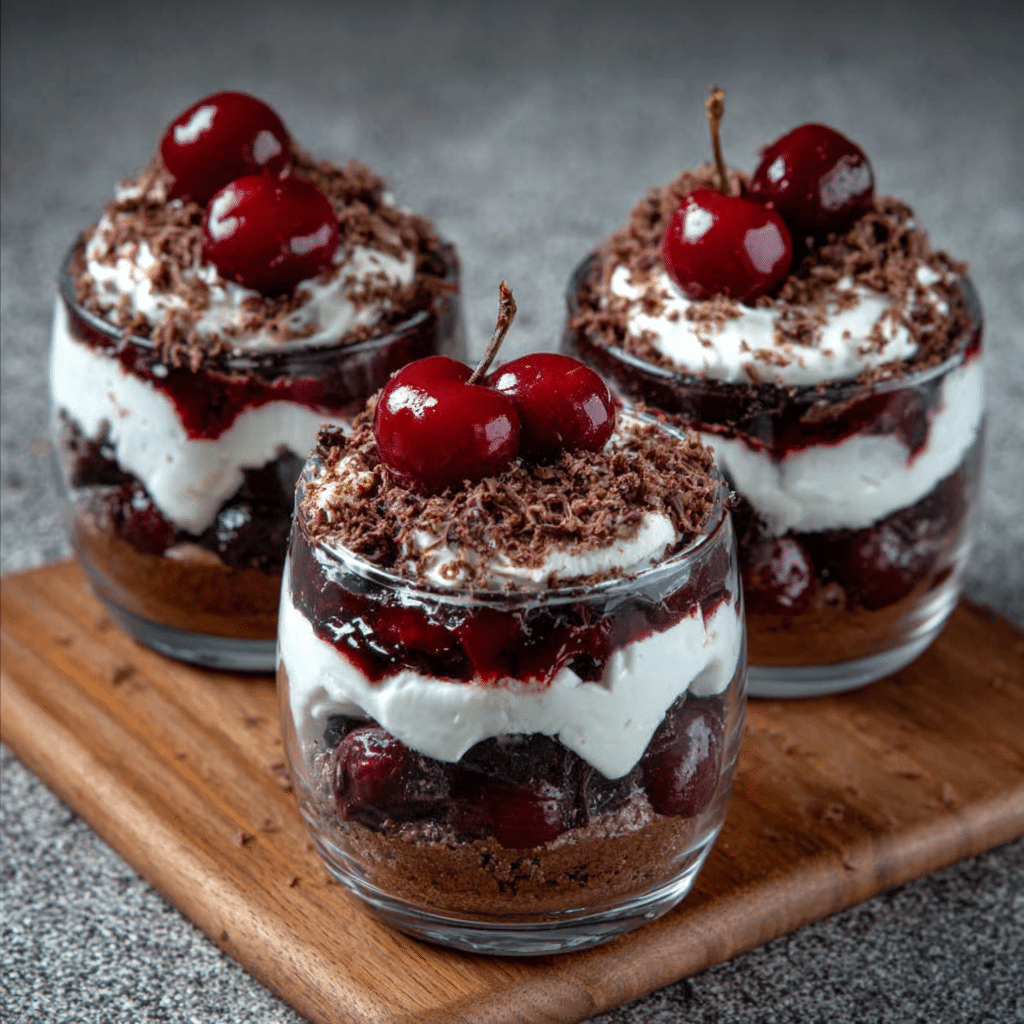
Introduction to Mini Black Forest Dessert Cups
Hey there, fellow dessert lovers! If you’re anything like me, you know that life can get pretty hectic, especially when juggling family, work, and everything in between. That’s why I’m excited to share my recipe for Mini Black Forest Dessert Cups. These little delights are not only delicious but also incredibly simple to whip up. Perfect for a quick solution on a busy day or a sweet treat to impress your loved ones, these cups are sure to bring smiles all around. Trust me, once you try them, you’ll be hooked!
Why You’ll Love This Mini Black Forest Dessert Cups
Let’s be honest—who doesn’t love a dessert that’s both easy to make and absolutely scrumptious? These Mini Black Forest Dessert Cups are a breeze to prepare, taking just 15 minutes of your time. Plus, they’re no-bake, which means less mess and more time to enjoy with family. The rich chocolate, sweet cherries, and fluffy whipped cream create a flavor explosion that will have everyone asking for seconds. Trust me, you’ll adore these little cups of joy!
Ingredients for Mini Black Forest Dessert Cups
Now, let’s dive into the ingredients that make these Mini Black Forest Dessert Cups so delightful! Each component plays a crucial role in creating that perfect balance of flavors and textures. Here’s what you’ll need:
- Heavy whipping cream: This is the star of the show! It adds that luscious, creamy texture that makes every bite feel indulgent. If you’re looking for a lighter option, you can swap it out for a low-fat whipped topping.
- Powdered sugar: Just a touch of sweetness to balance the richness of the cream. It dissolves easily, giving your whipped cream that perfect, silky finish.
- Vanilla extract: A splash of this aromatic extract enhances the flavor of the whipped cream, making it even more irresistible. You can use pure vanilla for a richer taste or imitation vanilla if that’s what you have on hand.
- Chocolate cake: You can use store-bought or homemade chocolate cake, crumbled into delightful bits. This adds a rich chocolatey base that pairs beautifully with the cherries. If you’re short on time, a pre-made cake is a lifesaver!
- Cherry pie filling: This is where the magic happens! The sweet and tart cherries bring a burst of flavor that complements the chocolate perfectly. You can use canned cherry pie filling for convenience or make your own if you’re feeling adventurous.
- Chocolate shavings or grated chocolate: These little bits of chocolate add a lovely finishing touch and a bit of crunch. You can easily make your own by using a vegetable peeler on a chocolate bar or buy pre-made shavings.
- Fresh cherries (optional): For a pop of color and freshness, top your dessert cups with a fresh cherry. It’s not just pretty; it adds a delightful burst of flavor too!
For exact measurements, you can find them at the bottom of the article, ready for printing. Now that you know what you need, let’s get ready to create some delicious Mini Black Forest Dessert Cups!
How to Make Mini Black Forest Dessert Cups
Now that we have our ingredients ready, let’s get to the fun part—making these delightful Mini Black Forest Dessert Cups! Follow these simple steps, and you’ll have a stunning dessert that’s sure to impress. Trust me, it’s easier than you think!
Step 1: Whip the Cream
First things first, let’s whip that cream! In a mixing bowl, combine the heavy whipping cream, powdered sugar, and vanilla extract. Using an electric mixer, beat the mixture on medium speed until soft peaks form. This means the cream should hold its shape but still be smooth and creamy. Be careful not to overwhip; we want it fluffy, not grainy! If you’ve ever made whipped cream before, you know how satisfying it is to see it transform. It’s like magic!
Step 2: Layer the Cake
Next, grab your small dessert cups or glasses. Start by adding a layer of crumbled chocolate cake at the bottom of each cup. This chocolatey base is what makes these Mini Black Forest Dessert Cups so special. If you’re using store-bought cake, just crumble it into bite-sized pieces. It doesn’t have to be perfect—rustic is charming! Plus, it’s a great way to use up leftover cake if you have any.
Step 3: Add Cherry Filling
Now, it’s time to add that luscious cherry pie filling. Spoon a generous layer over the crumbled cake. The sweet and tart cherries will soak into the cake a bit, creating a delightful flavor combination. If you’re using homemade cherry pie filling, make sure it’s cooled down before adding it. This layer is where the magic truly happens, bringing a burst of flavor that pairs beautifully with the chocolate!
Step 4: Spoon on the Whipped Cream
After the cherries, it’s time for the star of the show—the whipped cream! Gently spoon a layer of the whipped cream over the cherry filling. Don’t be shy; this is what makes these Mini Black Forest Dessert Cups so indulgent! Use the back of the spoon to spread it out evenly. You want to create a nice, fluffy layer that will make each bite feel like a cloud of sweetness.
Step 5: Repeat the Layers
Now, let’s repeat the layers! Add another layer of crumbled chocolate cake, followed by more cherry filling, and then another layer of whipped cream. Keep going until your cups are filled to the brim, finishing with a lovely dollop of whipped cream on top. This is where you can really get creative! If you have extra cake or cherries, feel free to add more layers. Just remember, the more layers, the more deliciousness!
Step 6: Garnish and Chill
Finally, it’s time to make these Mini Black Forest Dessert Cups look as good as they taste. Garnish the top with chocolate shavings or grated chocolate for that extra touch of elegance. If you have fresh cherries, pop one on top for a beautiful finish. Now, place the cups in the refrigerator and let them chill for at least 30 minutes. This allows all those flavors to meld together, making each bite even more delightful. Plus, it gives you a little time to relax before serving!

Tips for Success
- Make sure your heavy cream is cold for the best whipping results.
- Don’t overwhip the cream; stop when you see soft peaks for a light texture.
- Use a clear glass for serving to showcase those beautiful layers!
- Feel free to customize with your favorite fruits or cake flavors.
- Chill the dessert cups longer if you can; it enhances the flavors even more!
Equipment Needed
- Mixing bowl: A medium-sized bowl works best; you can use a large one if you’re making a double batch.
- Electric mixer: A hand mixer is perfect, but a whisk will do if you’re feeling strong!
- Dessert cups or glasses: Any small cups will work; mason jars add a cute touch!
- Spoon: For layering and serving; a spatula can help with spreading the whipped cream.
Variations
- Berry Bliss: Swap out the cherry pie filling for a mix of fresh strawberries, blueberries, and raspberries for a delightful summer twist.
- Nutty Delight: Add a layer of crushed nuts, like almonds or hazelnuts, between the cake and cherry layers for an extra crunch.
- Gluten-Free Option: Use gluten-free chocolate cake or crumbled brownies to make these Mini Black Forest Dessert Cups suitable for gluten-sensitive friends.
- Vegan Version: Substitute heavy cream with coconut cream and use a vegan chocolate cake for a plant-based treat everyone can enjoy.
- Minty Fresh: Add a few drops of peppermint extract to the whipped cream for a refreshing minty flavor that pairs beautifully with chocolate.
Serving Suggestions
- Pair these Mini Black Forest Dessert Cups with a hot cup of coffee or a chilled glass of milk for a delightful contrast.
- Serve alongside a light fruit salad to balance the richness of the dessert.
- For a festive touch, arrange the cups on a decorative platter with fresh mint leaves for garnish.
FAQs about Mini Black Forest Dessert Cups
1. Can I make Mini Black Forest Dessert Cups ahead of time?
Absolutely! These dessert cups can be made a day in advance. Just layer them up, cover with plastic wrap, and store them in the fridge. This actually allows the flavors to meld together beautifully, making them even more delicious when you serve them!
2. What can I substitute for cherry pie filling?
If cherries aren’t your thing, feel free to get creative! You can use fresh berries, like strawberries or raspberries, or even a different fruit filling, such as blueberry or peach. The beauty of these Mini Black Forest Dessert Cups is that they’re versatile!
3. How do I store leftover Mini Black Forest Dessert Cups?
If you happen to have any leftovers (which is rare in my house!), simply cover the cups with plastic wrap and store them in the refrigerator. They should be good for up to two days. Just remember, the longer they sit, the softer the cake will become!
4. Can I use a different type of cake?
Definitely! While chocolate cake is traditional, you can use any flavor you like. Vanilla, red velvet, or even a spice cake would work wonderfully. Just think of the flavor combinations you enjoy, and go for it!
5. Are Mini Black Forest Dessert Cups suitable for special diets?
Yes! You can easily adapt this recipe for various dietary needs. Use gluten-free cake for those with gluten sensitivities, or substitute the heavy cream with coconut cream for a vegan option. The possibilities are endless!
Final Thoughts
Creating these Mini Black Forest Dessert Cups is more than just whipping up a sweet treat; it’s about bringing joy to your kitchen and smiles to your loved ones. The delightful layers of chocolate, cherries, and whipped cream come together to create a dessert that feels special, yet is so easy to make. Whether it’s a family gathering or a quiet evening at home, these cups are sure to impress. So, roll up your sleeves, gather your ingredients, and let the magic happen. Trust me, the happiness these little cups bring is worth every minute spent in the kitchen!
Print
Mini Black Forest Dessert Cups: Deliciously Simple Recipe
Deliciously simple Mini Black Forest Dessert Cups that are perfect for any occasion.
- Total Time: 45 minutes (including chilling time)
- Yield: 4 servings 1x
Ingredients
- 1 cup heavy whipping cream
- 2 tablespoons powdered sugar
- 1 teaspoon vanilla extract
- 1 cup chocolate cake, crumbled (store-bought or homemade)
- 1 cup cherry pie filling (canned or homemade)
- 1/2 cup chocolate shavings or grated chocolate
- Fresh cherries for garnish (optional)
Instructions
- In a mixing bowl, whip the heavy cream, powdered sugar, and vanilla extract together until soft peaks form. Be careful not to overwhip.
- In small dessert cups or glasses, layer the crumbled chocolate cake at the bottom.
- Add a layer of cherry pie filling on top of the cake crumbles.
- Spoon a layer of the whipped cream over the cherry filling.
- Repeat the layers (cake, cherries, whipped cream) until the cups are filled, finishing with a layer of whipped cream on top.
- Garnish with chocolate shavings and a fresh cherry if desired.
- Chill the dessert cups in the refrigerator for at least 30 minutes before serving to allow the flavors to meld.
Notes
- For a lighter version, use a low-fat whipped topping instead of heavy cream.
- Substitute the cherry pie filling with fresh berries for a different flavor profile.
- Prep Time: 15 minutes
- Cook Time: 0 minutes
- Category: Dessert
- Method: No-bake
- Cuisine: American
- Diet: Vegetarian
Nutrition
- Serving Size: 1 cup
- Calories: 320
- Sugar: 15g
- Sodium: 50mg
- Fat: 20g
- Saturated Fat: 10g
- Unsaturated Fat: 8g
- Trans Fat: 0g
- Carbohydrates: 30g
- Fiber: 1g
- Protein: 4g
- Cholesterol: 60mg