

Introduction to Make Healthy Apple Cranberry Dog Dental Sticks
Hey there, fellow dog lovers! If you’re like me, your furry friend is more than just a pet; they’re family. That’s why I’m excited to share how to make healthy apple cranberry dog dental sticks at home! This recipe is not only a fun way to treat your pup, but it’s also a quick solution for those busy days when you want to whip up something nutritious. Plus, who doesn’t love the idea of giving their dog a tasty treat that also helps keep their teeth clean? Let’s dive into this delightful recipe together!
Why You’ll Love This Make Healthy Apple Cranberry Dog Dental Sticks
Let’s be honest—life can get hectic, especially when you’re juggling work, family, and everything in between. That’s why I adore this recipe! It’s quick, easy, and requires minimal ingredients, making it perfect for busy days. Plus, your pup will love the taste of apple and cranberry, and you’ll feel great knowing you’re giving them a healthy treat. It’s a win-win for both of you!
Ingredients for Make Healthy Apple Cranberry Dog Dental Sticks
Now that we’re all excited to get started, let’s gather our ingredients! Here’s what you’ll need to make healthy apple cranberry dog dental sticks:
- Whole wheat flour: This is the base of our dental sticks, providing a wholesome source of fiber and nutrients. It’s a great alternative to regular flour, making it easier on your pup’s tummy.
- Rolled oats: These add a lovely texture and are packed with vitamins and minerals. Plus, they help keep your dog feeling full and satisfied.
- Unsweetened applesauce: A fantastic way to add moisture and natural sweetness without any added sugars. Your dog will love the apple flavor!
- Dried cranberries: These little gems are not just tasty; they’re also rich in antioxidants. Just make sure to chop them up to avoid any choking hazards.
- Peanut butter (unsweetened and unsalted): A favorite among dogs! It adds flavor and helps bind the ingredients together. Just be sure to choose a brand that doesn’t contain xylitol, which is toxic to dogs.
- Water: This helps bring the dough together. You might need a bit more or less depending on the consistency of your dough.
- Large egg: This acts as a binding agent, helping everything stick together while adding a bit of protein.
- Cinnamon: Not only does it add a warm, inviting flavor, but it also has anti-inflammatory properties. Your dog will love the aroma!
For those of you who might want to switch things up, feel free to substitute the dried cranberries with other dog-safe fruits like blueberries or even pumpkin puree for a different flavor twist. And remember, the exact quantities for each ingredient are listed at the bottom of the article, so you can easily print them out for your next baking adventure!
How to Make Healthy Apple Cranberry Dog Dental Sticks
Now that we have our ingredients ready, let’s get our paws dirty and make healthy apple cranberry dog dental sticks! Follow these simple steps, and you’ll have a batch of tasty treats that your furry friend will adore. Trust me, it’s easier than you think!
Step 1: Preheat the Oven
First things first, let’s get that oven warmed up! Preheat your oven to 350°F. While it’s heating, line a baking sheet with parchment paper. This will prevent the sticks from sticking and make cleanup a breeze. Who doesn’t love an easy cleanup?
Step 2: Mix Dry Ingredients
In a large mixing bowl, combine the whole wheat flour, rolled oats, and cinnamon. Give it a good stir! The cinnamon not only adds flavor but also makes your kitchen smell heavenly. It’s like a warm hug for your senses!
Step 3: Combine Wet Ingredients
In another bowl, mix together the unsweetened applesauce, peanut butter, egg, and water until everything is well combined. This mixture is where the magic happens! The peanut butter will make your dog’s tail wag with excitement. Just make sure it’s unsweetened and unsalted—your pup will thank you!
Step 4: Form the Dough
Now, it’s time to bring the two mixtures together. Gradually add the wet ingredients to the dry ingredients, stirring until a dough forms. If the dough feels too dry, don’t panic! Just add a little more water, one tablespoon at a time, until it holds together nicely. You want it to be firm but not crumbly—think of it like a soft playdough!
Step 5: Add Cranberries
Once your dough is ready, it’s time to fold in those chopped dried cranberries. These little bursts of flavor will make the dental sticks even more delicious. Plus, they’re packed with antioxidants, which is a bonus for your pup’s health!
Step 6: Shape the Sticks
On a floured surface, roll out the dough to about 1/4 inch thick. This is where you can get creative! Use a cookie cutter or a knife to cut the dough into your desired shapes or sticks. I like to make them bone-shaped, but feel free to have fun with it! Just remember, the size should be appropriate for your dog.
Step 7: Bake the Sticks
Place the cut-out shapes onto the prepared baking sheet. Make sure they’re spaced out a bit so they have room to puff up. Bake for 25-30 minutes or until the sticks are golden brown and firm to the touch. Your kitchen will smell amazing during this time—just try not to sneak a taste yourself!
Step 8: Cool and Serve
Once they’re done baking, allow the dental sticks to cool completely on a wire rack. This step is crucial! You don’t want to serve them hot, as they could burn your pup’s mouth. Once cooled, they’re ready to be served! Watch your dog’s eyes light up as they enjoy their homemade treats. It’s moments like these that make all the effort worthwhile!

Tips for Success
- Make sure to measure your ingredients accurately for the best results.
- If the dough is too sticky, sprinkle a little more flour while rolling it out.
- Experiment with different shapes to keep things fun for your pup!
- Store the dental sticks in an airtight container to keep them fresh.
- Always supervise your dog while they enjoy their treats, especially if they’re new to them.
Equipment Needed
- Mixing bowls: A large bowl for mixing ingredients and a smaller one for wet ingredients. Any size will do!
- Baking sheet: A standard baking sheet works perfectly. You can also use a stoneware pan if you have one.
- Parchment paper: This helps prevent sticking. If you don’t have any, a silicone baking mat is a great alternative.
- Rolling pin: If you don’t have one, a clean wine bottle can work in a pinch!
- Cookie cutters or knife: Use any shape you like—get creative!
Variations
- Fruit Swap: Instead of dried cranberries, try using chopped dried apples or blueberries for a different fruity flavor that your dog will love.
- Herb Infusion: Add a teaspoon of parsley or mint to the dough for fresh breath benefits. Dogs love the taste, and it’s great for their dental health!
- Pumpkin Delight: Substitute half of the applesauce with pure pumpkin puree. It’s a fantastic way to add fiber and a seasonal twist!
- Grain-Free Option: Use almond flour or coconut flour instead of whole wheat flour for a grain-free version. Just be mindful of the moisture content, as these flours absorb more liquid.
- Cheesy Treats: Mix in a half cup of shredded low-fat cheese for a cheesy flavor that will have your pup begging for more!
Serving Suggestions
- Pair these dental sticks with a bowl of fresh water to keep your pup hydrated.
- Serve them as a reward after a fun training session or a long walk.
- For a special treat, present them in a cute dog bowl or on a colorful plate.
- Consider adding a few fresh apple slices as a side for a delightful snack combo!
FAQs about Make Healthy Apple Cranberry Dog Dental Sticks
Got questions? I’ve got answers! Here are some common queries about making healthy apple cranberry dog dental sticks that I often hear from fellow dog parents. Let’s clear up any confusion so you can get baking!
1. Can I use other fruits instead of cranberries?
Absolutely! You can substitute dried cranberries with other dog-safe fruits like blueberries or even chopped dried apples. Just make sure whatever you choose is safe for your pup. It’s a fun way to mix things up and keep your dog excited about treat time!
2. How long do these dental sticks last?
When stored in an airtight container, these healthy apple cranberry dog dental sticks can last up to two weeks. If you want to keep them fresh even longer, consider freezing them. Just thaw them out when you’re ready to treat your furry friend!
3. Can I make these dental sticks grain-free?
Yes, you can! To make healthy apple cranberry dog dental sticks grain-free, simply swap out the whole wheat flour for almond flour or coconut flour. Just keep in mind that these flours absorb more moisture, so you may need to adjust the water content in your dough.
4. My dog is picky. Will they like these dental sticks?
Many dogs love the combination of apple and peanut butter, but every pup is different! If your dog is a bit finicky, try adding a little more peanut butter or even some shredded cheese to the mix. You can also experiment with different shapes to make them more appealing!
5. How often can I give these dental sticks to my dog?
These treats are healthy and can be given as an occasional snack or reward. However, moderation is key! Depending on your dog’s size and dietary needs, one or two sticks a day should be just fine. Always consult your vet if you have concerns about your dog’s diet.
Final Thoughts
Making healthy apple cranberry dog dental sticks at home is not just about treating your furry friend; it’s about creating joyful moments together. Watching your pup wag their tail in excitement as they enjoy these homemade goodies is priceless. Plus, knowing you’ve crafted something nutritious and delicious adds a sprinkle of happiness to your day. So, roll up your sleeves, get baking, and enjoy the delightful bond that comes from sharing these tasty treats. Your dog will thank you with every wag and woof, and you’ll feel like a superstar pet parent!
Print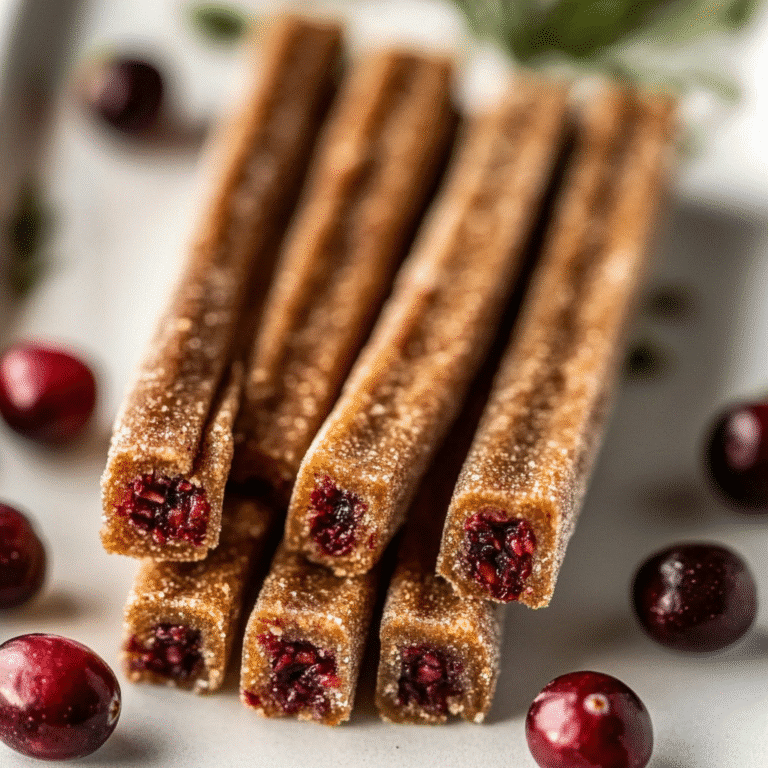
Make Healthy Apple Cranberry Dog Dental Sticks at Home!
A healthy recipe for making apple cranberry dog dental sticks at home.
- Total Time: 45 minutes
- Yield: 24 dental sticks 1x
Ingredients
- 2 cups whole wheat flour
- 1 cup rolled oats
- 1/2 cup unsweetened applesauce
- 1/2 cup dried cranberries, chopped
- 1/4 cup peanut butter (unsweetened and unsalted)
- 1/4 cup water (more if needed)
- 1 large egg
- 1 teaspoon cinnamon
Instructions
- Preheat your oven to 350°F and line a baking sheet with parchment paper.
- In a large mixing bowl, combine the whole wheat flour, rolled oats, and cinnamon.
- In another bowl, mix the applesauce, peanut butter, egg, and water until well combined.
- Gradually add the wet ingredients to the dry ingredients, stirring until a dough forms. If the dough is too dry, add a little more water, one tablespoon at a time, until it holds together.
- Fold in the chopped dried cranberries.
- On a floured surface, roll out the dough to about 1/4 inch thick. Use a cookie cutter or knife to cut the dough into desired shapes or sticks.
- Place the cut-out shapes onto the prepared baking sheet.
- Bake for 25-30 minutes or until the sticks are golden brown and firm to the touch.
- Allow the dental sticks to cool completely on a wire rack before serving them to your dog.
Notes
- This recipe makes about 24 dental sticks, depending on the size of your cutouts.
- For a softer treat, reduce the baking time by 5-10 minutes.
- You can substitute the dried cranberries with other dog-safe fruits like blueberries or pumpkin puree for a different flavor.
- Prep Time: 15 minutes
- Cook Time: 30 minutes
- Category: Dog Treats
- Method: Baking
- Cuisine: Pet Food
- Diet: Vegan
Nutrition
- Serving Size: 1 stick
- Calories: 45
- Sugar: 1g
- Sodium: 0mg
- Fat: 1g
- Saturated Fat: 0g
- Unsaturated Fat: 0g
- Trans Fat: 0g
- Carbohydrates: 8g
- Fiber: 1g
- Protein: 1g
- Cholesterol: 0mg