

Introduction to Beef and Bacon Roll-Ups Recipe
Hey there, fellow home cooks! If you’re anything like me, you know that life can get pretty hectic, especially when you’re juggling family, work, and everything in between. That’s why I’m excited to share my Beef and Bacon Roll-Ups Recipe with you! This dish is not just a quick solution for a busy day; it’s also a savory delight that’s sure to impress your loved ones. Imagine crispy bacon wrapped around juicy beef, all baked to perfection. Trust me, these roll-ups will have everyone asking for seconds, and you’ll love how easy they are to whip up!
Why You’ll Love This Beef and Bacon Roll-Ups Recipe
Let’s be honest—who doesn’t love the combination of beef and bacon? This Beef and Bacon Roll-Ups Recipe is not only delicious but also incredibly easy to make. In just 40 minutes, you can have a mouthwatering dish that works as a fantastic appetizer or a satisfying main course. Plus, it’s a hit with picky eaters, making it a perfect choice for family dinners or gatherings with friends!
Ingredients for Beef and Bacon Roll-Ups Recipe
Now, let’s dive into the ingredients that make this Beef and Bacon Roll-Ups Recipe a true winner! Each component plays a vital role in creating that mouthwatering flavor and texture we all crave. Here’s what you’ll need:
- Ground Beef: The star of the show! Choose a lean ground beef for a juicy yet not overly greasy roll-up. It’s packed with protein and flavor.
- Bacon: Ah, the crispy goodness! Bacon adds a savory crunch that complements the beef perfectly. You can opt for regular or thick-cut bacon, depending on your preference.
- Garlic Powder: This adds a warm, aromatic flavor that elevates the dish. Fresh garlic can be used too, but the powder blends seamlessly into the beef mixture.
- Onion Powder: A must-have for that savory depth. It’s a great way to infuse flavor without the hassle of chopping onions!
- Smoked Paprika: This spice brings a subtle smokiness that pairs beautifully with the bacon. It’s like a warm hug for your taste buds!
- Salt: Essential for enhancing all the flavors. Just a pinch will do, but feel free to adjust according to your taste.
- Black Pepper: A dash of black pepper adds a bit of heat and complexity. It’s the perfect finishing touch!
- Shredded Cheddar Cheese: Because who doesn’t love cheese? It melts beautifully and adds a creamy texture to the roll-ups.
- Chopped Green Onions: These add a fresh, crisp bite and a pop of color. They’re a great way to brighten up the dish!
- Worcestershire Sauce: This sauce brings a tangy, umami flavor that ties everything together. It’s a secret weapon in many savory dishes!
- Olive Oil: A light brush of olive oil before baking helps achieve that golden, crispy finish. Plus, it adds a touch of richness.
For those looking to spice things up, consider adding a pinch of cayenne pepper to the beef mixture for a kick! If you’re looking for a lighter option, ground turkey or chicken can be substituted, just keep an eye on the cooking time. You can find the exact measurements for each ingredient at the bottom of the article, ready for printing!
How to Make Beef and Bacon Roll-Ups Recipe
Now that we have our ingredients ready, let’s get cooking! Making these Beef and Bacon Roll-Ups is a straightforward process that anyone can master. Follow these simple steps, and you’ll have a delicious dish that’s sure to impress!
Step 1: Preheat the Oven
First things first, preheat your oven to 400°F. This step is crucial because it ensures that your roll-ups cook evenly and get that perfect crispy finish. While the oven heats up, prepare a baking sheet by lining it with parchment paper. This will make cleanup a breeze!
Step 2: Prepare the Beef Mixture
In a large bowl, combine the ground beef, garlic powder, onion powder, smoked paprika, salt, black pepper, Worcestershire sauce, shredded cheddar cheese, and chopped green onions. Mix everything together until well blended. Each ingredient plays a vital role: the spices add flavor, the cheese brings creaminess, and the green onions add a fresh crunch. Don’t be afraid to get your hands in there; it’s the best way to ensure everything is mixed thoroughly!
Step 3: Roll the Bacon
Now comes the fun part! Lay out your bacon slices on a flat surface. Take about 2 tablespoons of the beef mixture and shape it into a small log. Position this log at one end of a bacon slice and roll it up tightly, making sure the beef is completely wrapped. The bacon will not only add flavor but also help keep the beef moist while it cooks. Repeat this process until you’ve used all the beef mixture and bacon slices. It’s like wrapping a little present of deliciousness!
Step 4: Arrange on Baking Sheet
Place the bacon-wrapped beef roll-ups on the prepared baking sheet, seam side down. This helps keep them from unrolling during baking. For an extra crispy finish, lightly brush the tops with olive oil. This little step makes a big difference in achieving that golden-brown color!
Step 5: Bake to Perfection
Pop the baking sheet into the preheated oven and bake for 20-25 minutes. Keep an eye on them! You’ll know they’re done when the bacon is golden and crispy, and the internal temperature of the beef reaches 160°F. A meat thermometer is your best friend here!
Step 6: Rest and Serve
Once they’re out of the oven, let the roll-ups rest for a few minutes. This step is important because it allows the juices to redistribute, making each bite even more flavorful. After resting, serve them up and watch your family devour these tasty Beef and Bacon Roll-Ups!
Tips for Success
- Use lean ground beef to keep the roll-ups juicy without being greasy.
- Don’t skip the resting time after baking; it makes a world of difference in flavor.
- Experiment with different cheeses like pepper jack for a spicy twist!
- Make a double batch and freeze some for a quick meal later.
- For even more flavor, marinate the beef mixture for an hour before rolling.
Equipment Needed
- Baking Sheet: A standard baking sheet works perfectly, but a rimmed sheet can catch any drips.
- Parchment Paper: This makes cleanup easy; aluminum foil can be used as an alternative.
- Mixing Bowl: Any large bowl will do; a stand mixer can save time if you have one.
- Meat Thermometer: Essential for checking doneness; a simple knife can also help if you don’t have one.
Variations
- Spicy Kick: Add 1/2 teaspoon of cayenne pepper or your favorite hot sauce to the beef mixture for a fiery twist!
- Cheesy Delight: Swap out the cheddar for pepper jack or mozzarella for a different cheesy experience.
- Herb Infusion: Mix in fresh herbs like parsley or cilantro to the beef mixture for a burst of freshness.
- Vegetarian Option: Use a plant-based ground meat alternative and turkey bacon for a vegetarian-friendly version.
- BBQ Flavor: Brush the roll-ups with your favorite BBQ sauce before baking for a sweet and tangy flavor.
Serving Suggestions
- Fresh Salad: Pair your Beef and Bacon Roll-Ups with a crisp garden salad for a refreshing contrast.
- Dipping Sauces: Serve with ranch, BBQ, or spicy mustard for an extra flavor boost.
- Drink Pairing: A chilled glass of iced tea or a light red wine complements the savory flavors beautifully.
- Presentation: Arrange on a platter with toothpicks for easy serving at parties or gatherings!
FAQs about Beef and Bacon Roll-Ups Recipe
1. Can I make Beef and Bacon Roll-Ups ahead of time?
Absolutely! You can prepare the roll-ups in advance and store them in the refrigerator for up to 24 hours before baking. Just cover them tightly with plastic wrap or foil. When you’re ready to cook, simply pop them in the oven as directed. This makes it a great option for busy weeknights or entertaining!
2. What can I serve with Beef and Bacon Roll-Ups?
These roll-ups are versatile! They pair wonderfully with a fresh salad, roasted vegetables, or even some crispy potato wedges. You can also serve them with a variety of dipping sauces like ranch, BBQ, or spicy mustard to elevate the flavor even more!
3. Can I use a different type of meat?
Yes, you can! While this Beef and Bacon Roll-Ups Recipe is delicious with ground beef, feel free to substitute it with ground turkey or chicken for a lighter option. Just keep an eye on the cooking time, as leaner meats may cook faster.
4. How do I know when the roll-ups are done?
The best way to check for doneness is to use a meat thermometer. The internal temperature should reach 160°F for beef. If you don’t have a thermometer, you can cut one open to ensure the beef is no longer pink and the juices run clear.
5. Can I freeze the Beef and Bacon Roll-Ups?
Definitely! These roll-ups freeze well. Just prepare them as directed, then place them in a single layer on a baking sheet to freeze. Once frozen, transfer them to a freezer-safe bag. When you’re ready to enjoy, bake them straight from the freezer, adding a few extra minutes to the cooking time.
Final Thoughts
Cooking should be a joy, not a chore, and my Beef and Bacon Roll-Ups Recipe embodies that spirit perfectly! With their crispy bacon and savory beef, these roll-ups are not just a meal; they’re a delightful experience that brings family and friends together. Whether you’re hosting a gathering or just looking for a quick weeknight dinner, these little bites of happiness will surely impress. Plus, they’re so easy to make that you’ll find yourself whipping them up time and again. So, roll up your sleeves, and let’s get cooking—your taste buds will thank you!
Print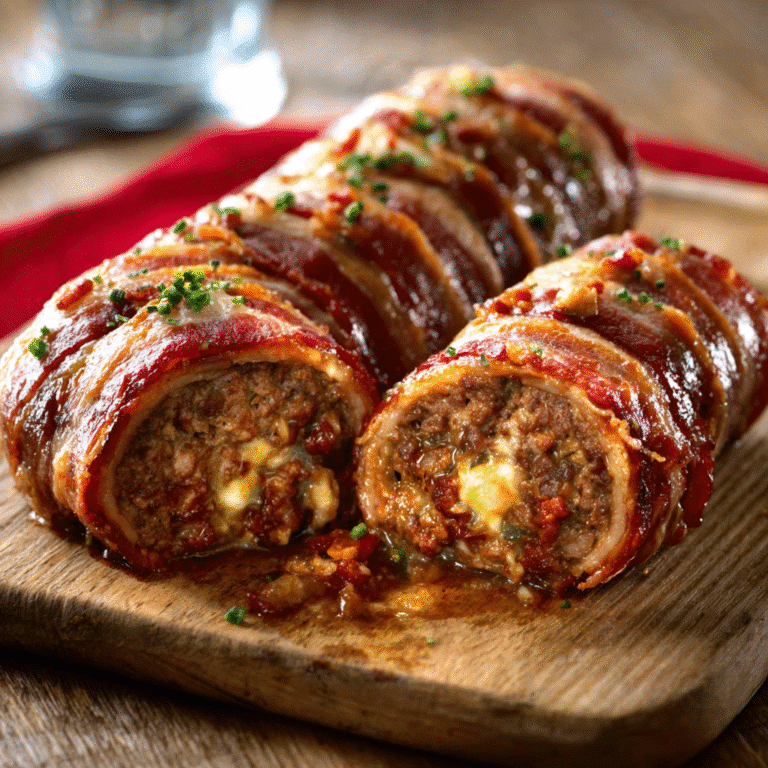
Beef and Bacon Roll-Ups Recipe: Try This Savory Delight!
A savory and delicious recipe for Beef and Bacon Roll-Ups that makes for a perfect appetizer or main course.
- Total Time: 40 minutes
- Yield: 4 servings 1x
Ingredients
- 1 pound ground beef
- 8 slices of bacon
- 1 teaspoon garlic powder
- 1 teaspoon onion powder
- 1 teaspoon smoked paprika
- 1 teaspoon salt
- 1/2 teaspoon black pepper
- 1/4 cup shredded cheddar cheese
- 1/4 cup chopped green onions
- 1 tablespoon Worcestershire sauce
- 1 tablespoon olive oil
Instructions
- Preheat your oven to 400°F and prepare a baking sheet with parchment paper.
- In a large bowl, mix together the ground beef, garlic powder, onion powder, smoked paprika, salt, black pepper, Worcestershire sauce, cheddar cheese, and green onions until well blended.
- On a flat surface, lay out the bacon slices. Take approximately 2 tablespoons of the beef mixture and shape it into a small log. Position the log at one end of a bacon slice and roll it up tightly.
- Continue this process until all the beef mixture and bacon slices are used.
- Arrange the bacon-wrapped beef bites on the baking sheet with the seam side facing down. Lightly brush the tops with olive oil for extra crunch.
- Bake in the oven for 20-25 minutes, or until the bacon is golden and crispy, and the beef is thoroughly cooked (internal temperature should reach 160°F).
- Allow the bites to rest for a few minutes before serving.
Notes
- For a spicy twist, add 1/2 teaspoon of cayenne pepper to the beef mixture.
- Ground turkey or chicken can be used as a lighter alternative, adjusting the cooking time as necessary.
- Prep Time: 15 minutes
- Cook Time: 25 minutes
- Category: Appetizer/Main Course
- Method: Baking
- Cuisine: American
- Diet: Gluten Free
Nutrition
- Serving Size: 1 roll-up
- Calories: 350
- Sugar: 0g
- Sodium: 800mg
- Fat: 28g
- Saturated Fat: 10g
- Unsaturated Fat: 18g
- Trans Fat: 0g
- Carbohydrates: 2g
- Fiber: 0g
- Protein: 24g
- Cholesterol: 80mg