

Introduction to Tamina Sahrawiya
Hey there, fellow food lovers! If you’re looking for a delightful treat that’s as comforting as a warm hug, let me introduce you to Tamina Sahrawiya. This traditional North African dessert is not just a recipe; it’s a celebration of flavors and textures that can brighten up any busy day. Whether you’re hosting a gathering or simply want to impress your loved ones, this dish is a quick solution that’s sure to please. With its nutty goodness and a drizzle of honey, Tamina Sahrawiya is a sweet escape that’s easy to whip up, even on the most hectic days!
Why You’ll Love This Tamina Sahrawiya
Let’s be honest—life can get pretty hectic, right? That’s why you’ll adore Tamina Sahrawiya. It’s not just delicious; it’s also incredibly easy to make! In under an hour, you can create a mouthwatering dessert that feels fancy but requires minimal effort. Plus, the combination of semolina, nuts, and honey is a flavor explosion that will have your family asking for seconds. Trust me, this recipe is a keeper!
Ingredients for Tamina Sahrawiya
Now, let’s dive into the ingredients that make Tamina Sahrawiya such a delightful treat. Each component plays a vital role in creating that perfect balance of flavor and texture. Here’s what you’ll need:
- Semolina flour: This is the star of the show! It gives the dish its unique texture and a slightly nutty flavor. You can find it in most grocery stores, often in the baking aisle.
- Salt: Just a pinch enhances the sweetness and balances the flavors. It’s a small but mighty ingredient!
- Sugar: A touch of sweetness is essential. You can adjust the amount based on your preference or even use a sugar substitute if you’re watching your intake.
- Warm water: This helps to bring the dough together. Make sure it’s not too hot, or it might cook the semolina!
- Olive oil: Adds richness and moisture to the dough. You can substitute it with melted butter for a different flavor profile.
- Baking powder: This is your leavening agent, ensuring the discs puff up nicely while cooking.
- Ground cinnamon: A warm spice that adds depth and a hint of sweetness. Feel free to adjust based on your taste—cinnamon lovers might want to add a bit more!
- Chopped nuts: Almonds or walnuts work beautifully here. They add crunch and a nutty flavor that complements the semolina perfectly. You can also use pecans or pistachios for a twist!
- Raisins or dried apricots: These dried fruits bring a chewy texture and natural sweetness. If you’re not a fan, try using dried figs or cranberries instead.
- Honey: For drizzling on top before serving, honey adds a lovely sweetness that ties everything together. You can also use maple syrup for a different flavor.
For exact measurements, check the bottom of the article where you can find everything listed for easy printing. Now that you know what goes into this delicious dish, let’s get cooking!
How to Make Tamina Sahrawiya
Now that we’ve gathered our ingredients, let’s roll up our sleeves and dive into making this delightful Tamina Sahrawiya. I promise, it’s easier than you might think! Follow these simple steps, and you’ll have a delicious dessert ready in no time.
Step 1: Prepare the Dry Ingredients
Start by grabbing a large mixing bowl. In it, combine the semolina flour, salt, sugar, and baking powder. Give it a good stir to ensure everything is evenly mixed. This step is crucial because it sets the foundation for your Tamina Sahrawiya. Think of it as creating a solid base for a beautiful cake!
Step 2: Form the Dough
Next, it’s time to bring the dough to life! Gradually add the warm water and olive oil to your dry mixture. As you pour, stir continuously until a dough begins to form. It should be soft but not sticky. If it feels too dry, add a splash more water. This is where the magic starts to happen!
Step 3: Knead the Dough
Now, let’s get our hands a little messy! Transfer the dough to a lightly floured surface and knead it for about 5 minutes. You want it to become smooth and elastic. Think of it as giving your dough a little workout. This step is essential for developing that lovely texture we all crave in Tamina Sahrawiya.
Step 4: Rest the Dough
Once your dough is kneaded to perfection, cover it with a damp cloth and let it rest for 30 minutes. This resting period allows the gluten to relax, making it easier to shape later. Use this time to tidy up your kitchen or maybe enjoy a cup of tea—you deserve it!
Step 5: Shape the Discs
After the dough has rested, it’s time to divide it into small balls, about the size of a golf ball. Flatten each ball into a disc that’s about 1/4 inch thick. Don’t worry if they’re not perfect circles; they’ll still taste amazing! This is where you can get creative—make them as thick or thin as you like!
Step 6: Cook the Discs
Heat a non-stick skillet over medium heat. Once it’s hot, place each disc in the skillet and cook for about 3-4 minutes on each side. You’re looking for a lovely golden brown color. The aroma will fill your kitchen, and trust me, it’s hard to resist sneaking a taste!
Step 7: Prepare the Filling
While the discs are cooking, let’s whip up the filling! In a small bowl, mix together the chopped nuts and your choice of dried fruits. This mixture is what makes Tamina Sahrawiya so special. Feel free to get creative here—add chocolate chips or coconut flakes for a fun twist!
Step 8: Assemble the Tamina Sahrawiya
Once your discs are cooked and slightly cooled, it’s time to fill them. Place a spoonful of the nut mixture in the center of each disc and fold it over to create a half-moon shape. Press the edges gently to seal them. This is where the magic happens—each bite will be a delightful surprise!
Step 9: Drizzle with Honey
Finally, for that extra touch of sweetness, drizzle honey over the filled discs before serving. This step is optional, but I highly recommend it! The honey adds a beautiful gloss and a burst of flavor that ties everything together. Your Tamina Sahrawiya is now ready to be enjoyed!

Tips for Success
- Make sure your water is warm, not hot, to avoid cooking the semolina.
- Don’t skip the resting time for the dough; it’s crucial for the best texture.
- Experiment with different nuts and dried fruits to find your favorite combination.
- Keep an eye on the discs while cooking to prevent burning; they can go from golden to charred quickly!
- For a fun twist, try adding spices like nutmeg or cardamom to the dough.
Equipment Needed
- Mixing bowl: A large bowl for combining ingredients. A sturdy pot can work in a pinch!
- Rolling pin: For flattening the dough. If you don’t have one, a wine bottle will do just fine!
- Non-stick skillet: Essential for cooking the discs. A regular skillet with a bit of oil can also work.
- Measuring cups and spoons: For accuracy in your ingredients. If you’re feeling adventurous, you can eyeball it!
Variations of Tamina Sahrawiya
- Chocolate Lovers: Add chocolate chips to the nut mixture for a rich, indulgent twist. Who can resist chocolate?
- Coconut Delight: Mix in shredded coconut with the nuts and dried fruits for a tropical flair. It adds a lovely chewiness!
- Spiced Up: Experiment with spices like nutmeg or cardamom in the dough for an aromatic kick. It’s a great way to change things up!
- Gluten-Free Option: Substitute semolina flour with a gluten-free flour blend. Just make sure to adjust the liquid as needed!
- Nut-Free Version: If you have nut allergies, try using seeds like sunflower or pumpkin seeds instead. They add a nice crunch without the nuts!
- Fruit Forward: Swap out the raisins or dried apricots for chopped dates or figs for a different sweetness profile. It’s a delicious way to mix things up!
Serving Suggestions for Tamina Sahrawiya
- Pair with a cup of mint tea for a refreshing contrast to the sweetness.
- Serve alongside a scoop of vanilla ice cream for a delightful dessert experience.
- Garnish with fresh fruit like berries or sliced oranges for a pop of color.
- Present on a beautiful platter, drizzled with extra honey for an elegant touch.
- Enjoy as a snack with coffee or tea for a cozy afternoon treat!
FAQs about Tamina Sahrawiya
As you embark on your journey to create Tamina Sahrawiya, you might have a few questions. Don’t worry; I’ve got you covered! Here are some common queries that pop up when making this delightful dessert:
1. Can I make Tamina Sahrawiya ahead of time?
Absolutely! You can prepare the discs and filling in advance. Just store them separately in airtight containers in the fridge. When you’re ready to serve, simply cook the discs and assemble them. It’s a great way to save time on busy days!
2. What can I substitute for semolina flour?
If you’re looking for alternatives, you can use a gluten-free flour blend or even all-purpose flour. Just keep in mind that the texture might vary slightly. Experimenting is part of the fun, so don’t hesitate to try different options!
3. How do I store leftover Tamina Sahrawiya?
Store any leftovers in an airtight container at room temperature for up to two days. If you want to keep them longer, refrigerate them for up to a week. Just reheat them in a skillet for a few minutes before enjoying!
4. Can I freeze Tamina Sahrawiya?
Yes, you can freeze the uncooked discs! Just place them in a single layer on a baking sheet until frozen, then transfer them to a freezer bag. When you’re ready to enjoy, cook them straight from the freezer—no need to thaw!
5. What are some variations I can try with Tamina Sahrawiya?
There are so many delicious variations to explore! You can add chocolate chips, shredded coconut, or even different spices like nutmeg or cardamom to the dough. Feel free to get creative with your fillings too—dried fruits, nuts, or even a nut-free option with seeds!
Final Thoughts
Making Tamina Sahrawiya is more than just whipping up a dessert; it’s about creating moments of joy and connection in your kitchen. The delightful aroma that fills your home, the laughter shared while assembling the discs, and the smiles on your loved ones’ faces as they take that first bite—these are the memories that make cooking worthwhile. Whether it’s a special occasion or a simple weeknight treat, this recipe brings a touch of warmth and sweetness to your table. So, roll up your sleeves, gather your ingredients, and let the magic of Tamina Sahrawiya brighten your day!
Print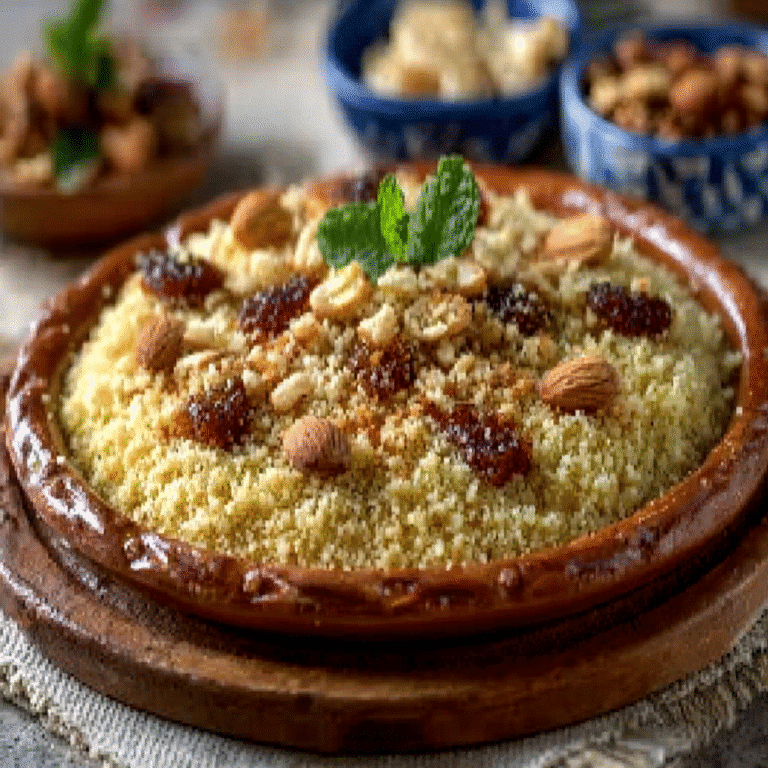
Tamina Sahrawiya: Discover This Delicious Recipe Today!
Tamina Sahrawiya is a delicious and traditional dish made with semolina flour, nuts, and dried fruits, perfect for any occasion.
- Total Time: 50 minutes
- Yield: 6 servings 1x
Ingredients
- 2 cups semolina flour
- 1 teaspoon salt
- 1 tablespoon sugar
- 1 cup warm water
- 1 tablespoon olive oil
- 1 teaspoon baking powder
- 1 teaspoon ground cinnamon
- 1/2 cup chopped nuts (almonds or walnuts)
- 1/2 cup raisins or dried apricots (chopped)
- Honey for drizzling
Instructions
- In a large mixing bowl, combine the semolina flour, salt, sugar, and baking powder. Mix well to ensure even distribution of the dry ingredients.
- Gradually add the warm water and olive oil to the dry mixture, stirring continuously until a dough forms.
- Knead the dough on a lightly floured surface for about 5 minutes until it becomes smooth and elastic.
- Cover the dough with a damp cloth and let it rest for 30 minutes.
- After resting, divide the dough into small balls (about the size of a golf ball).
- Flatten each ball into a disc about 1/4 inch thick.
- Preheat a non-stick skillet over medium heat. Cook each disc for about 3-4 minutes on each side, or until golden brown and cooked through.
- Remove from the skillet and let cool slightly.
- In a small bowl, mix the chopped nuts and raisins or dried apricots.
- Place a spoonful of the nut mixture in the center of each disc and fold it over to create a half-moon shape.
- Drizzle honey over the filled discs before serving.
Notes
- For a sweeter version, add a teaspoon of vanilla extract to the dough.
- Experiment with different fillings such as chocolate chips or coconut flakes for a unique twist.
- Prep Time: 30 minutes
- Cook Time: 20 minutes
- Category: Dessert
- Method: Skillet
- Cuisine: North African
- Diet: Vegetarian
Nutrition
- Serving Size: 1 disc
- Calories: 210
- Sugar: 5g
- Sodium: 200mg
- Fat: 7g
- Saturated Fat: 1g
- Unsaturated Fat: 6g
- Trans Fat: 0g
- Carbohydrates: 30g
- Fiber: 2g
- Protein: 5g
- Cholesterol: 0mg