
Introduction to Lobster Rolls (East Coast Style)
Hey there, fellow food lovers! If you’re anything like me, you know that life can get pretty hectic, especially when juggling family, work, and everything in between. That’s why I’m excited to share my go-to recipe for Lobster Rolls (East Coast Style). These delightful sandwiches are not only a quick solution for a busy day but also a surefire way to impress your loved ones. Imagine biting into a soft, buttery roll filled with fresh, succulent lobster meat and a creamy dressing. It’s like a little taste of summer, no matter the season!
Why You’ll Love This Lobster Rolls (East Coast Style)
Let’s be honest—who doesn’t love a meal that’s both delicious and easy to whip up? These Lobster Rolls (East Coast Style) are a breeze to make, taking just about 10 minutes of prep time. Plus, they’re perfect for those busy weeknights or casual gatherings. The combination of fresh lobster and creamy dressing creates a flavor explosion that will have your family raving. Trust me, you’ll want to make these again and again!
Ingredients for Lobster Rolls (East Coast Style)
Now, let’s dive into the ingredients that make these Lobster Rolls (East Coast Style) so irresistible! Each component plays a vital role in creating that perfect balance of flavors and textures. Here’s what you’ll need:
- Cooked lobster meat: The star of the show! Fresh, sweet lobster meat is what makes these rolls shine. You can use leftover lobster from a previous meal or buy it pre-cooked from your local seafood market.
- Creamy mayonnaise: This adds richness and creaminess to the lobster mixture. If you’re feeling adventurous, try using a flavored mayo, like garlic or chipotle, for a twist!
- Freshly squeezed lemon juice: A splash of lemon juice brightens up the flavors and adds a refreshing zing. Trust me, it’s a game-changer!
- Whole grain mustard: This gives a subtle tang and depth to the dressing. If you prefer a milder flavor, you can swap it for yellow mustard.
- Sea salt and freshly ground black pepper: Essential for seasoning! Adjust these to your taste, but don’t skip them—they enhance all the other flavors.
- Finely diced celery: This adds a delightful crunch and freshness to the mixture. If you’re not a fan of celery, you can substitute it with diced pickles or even apples for a sweet twist.
- Soft New England-style rolls: These rolls are key to achieving that authentic East Coast experience. They’re soft, slightly sweet, and perfect for holding all that delicious lobster goodness. If you can’t find them, any soft sandwich roll will do.
- Softened unsalted butter: This is for toasting the rolls to golden perfection. It adds a rich flavor and a crispy texture that’s simply irresistible.
- Fresh chives (optional): Chopped chives add a pop of color and a mild onion flavor. They’re optional, but I highly recommend them for that extra touch!
- Fresh lettuce leaves (optional): For serving, these add a nice crunch and freshness. You can use romaine, butter lettuce, or whatever you have on hand.
For exact measurements, check the bottom of the article where you can find everything listed for easy printing. Now that you know what you need, let’s get cooking!
How to Make Lobster Rolls (East Coast Style)
Now that we have our ingredients ready, let’s dive into the fun part—making these delicious Lobster Rolls (East Coast Style)! Follow these simple steps, and you’ll have a mouthwatering meal in no time.
Step 1: Prepare the Lobster Mixture
First things first, grab a large bowl and toss in your diced lobster meat. This is where the magic begins! Add in the creamy mayonnaise, freshly squeezed lemon juice, whole grain mustard, sea salt, black pepper, and finely diced celery. Now, here’s the key: stir everything together gently. You want to ensure that all those flavors mingle beautifully without breaking up the lobster too much. It’s like a little dance party in your bowl!
Step 2: Chill the Mixture
Once your lobster mixture is well combined, cover the bowl with a lid or some plastic wrap. Pop it in the refrigerator for about 30 minutes. This chilling time is crucial—it allows the flavors to deepen and develop. Plus, it makes the filling nice and cool, which is perfect for our rolls. While you wait, you can take a moment to relax or even sneak a taste (I won’t tell!).
Step 3: Toast the Rolls
While the lobster mixture is chilling, it’s time to get those rolls ready! Heat a frying pan over medium heat. Take your softened unsalted butter and generously spread it on the outer sides of each roll. This is where the magic happens! Place the rolls in the pan and toast them, turning occasionally, until they’re golden and crispy—about 2-3 minutes on each side. The aroma of toasting bread is simply irresistible, isn’t it?
Step 4: Assemble the Rolls
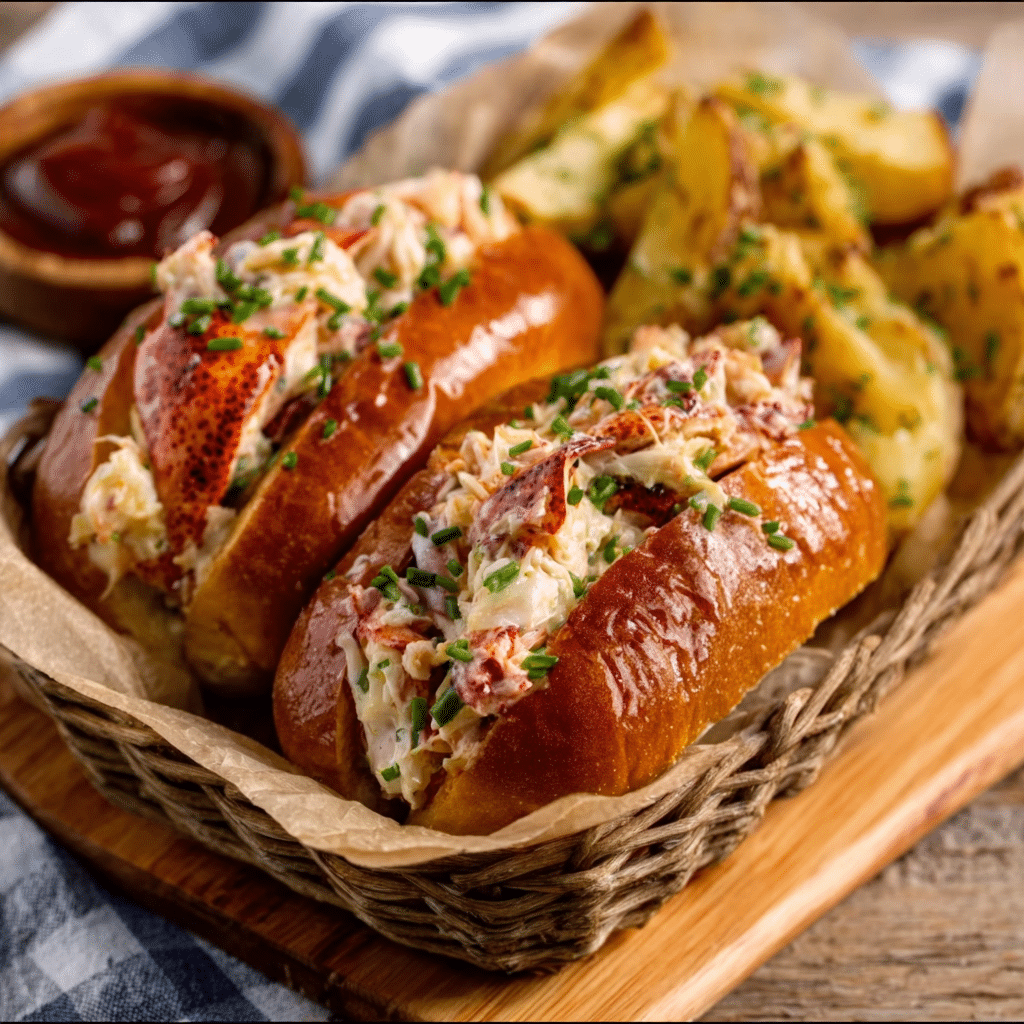
Now comes the fun part—assembling your Lobster Rolls (East Coast Style)! Once the rolls are perfectly toasted, it’s time to fill them up. Generously spoon the chilled lobster mixture into each roll. Don’t be shy; pile it high! You want each bite to be bursting with that delicious lobster goodness. It’s like a treasure chest of flavor waiting to be discovered!
Step 5: Garnish and Serve
For that extra touch, sprinkle some chopped chives on top of your filled rolls. They add a lovely pop of color and a hint of onion flavor that complements the lobster beautifully. If you’re feeling fancy, serve your rolls on a bed of fresh lettuce leaves. Not only does it look great, but it also adds a nice crunch. And there you have it—your Lobster Rolls (East Coast Style) are ready to be devoured!

Tips for Success
- Use fresh lobster for the best flavor—if you can, buy it from a local seafood market.
- Don’t skip the chilling step; it enhances the flavors and makes the filling refreshing.
- Feel free to adjust the seasoning to suit your taste—everyone’s palate is different!
- For a fun twist, try adding diced apples or pickles to the lobster mixture.
- Keep an eye on the rolls while toasting; they can go from golden to burnt in a flash!
Equipment Needed
- Large mixing bowl: Any bowl will do, but a glass or stainless steel one is great for mixing.
- Frying pan: A non-stick skillet works best for toasting the rolls.
- Spatula: Use this to flip the rolls easily without making a mess.
- Measuring cups and spoons: Essential for accurate ingredient measurements.
Variations of Lobster Rolls (East Coast Style)
- Spicy Lobster Rolls: Add a kick by mixing in some diced jalapeños or a splash of hot sauce to the lobster mixture. It’s a great way to spice things up!
- Herbed Lobster Rolls: Incorporate fresh herbs like dill or parsley into the lobster mixture for an aromatic twist. It adds a fresh, garden-like flavor that’s simply delightful.
- Avocado Lobster Rolls: For a creamy and nutritious twist, mash some ripe avocado into the lobster mixture. It adds a rich texture and a hint of earthiness.
- Vegan Lobster Rolls: Substitute the lobster with marinated hearts of palm or jackfruit for a plant-based version. Use vegan mayo to keep it creamy and delicious!
- New England Clam Rolls: Swap out the lobster for fresh clams for a different take on the classic. Just follow the same recipe, and you’ll have a clam roll that’s equally satisfying!
Serving Suggestions for Lobster Rolls (East Coast Style)
- Classic Potato Chips: Serve with a side of crispy potato chips for that perfect crunch.
- Coleslaw: A refreshing coleslaw pairs beautifully with the richness of the lobster rolls.
- Lemonade: A chilled glass of lemonade complements the flavors and adds a refreshing touch.
- Presentation: Serve on a wooden board with lemon wedges for a rustic, beachy vibe!
FAQs about Lobster Rolls (East Coast Style)
Got questions about making the perfect Lobster Rolls (East Coast Style)? You’re not alone! Here are some common queries I’ve encountered, along with my answers to help you navigate this delicious dish.
1. Can I use frozen lobster for my Lobster Rolls?
Absolutely! Frozen lobster can be a convenient option, especially if fresh isn’t available. Just make sure to thaw it properly before cooking. The flavor might not be as vibrant as fresh, but it’ll still make for a tasty lobster roll!
2. How do I store leftover lobster mixture?
If you have any leftover lobster mixture, store it in an airtight container in the refrigerator. It should last for about 2-3 days. Just remember to give it a good stir before using it again, as the ingredients may separate a bit.
3. What can I substitute for mayonnaise in the lobster mixture?
If you’re looking for a lighter option, Greek yogurt is a fantastic substitute for mayonnaise. It adds creaminess while cutting down on calories. You can also try avocado for a rich, creamy texture that’s packed with healthy fats!
4. Can I make Lobster Rolls (East Coast Style) ahead of time?
Yes, you can prepare the lobster mixture a day in advance and store it in the fridge. Just toast the rolls right before serving to keep them fresh and crispy. This way, you can enjoy a stress-free meal with minimal last-minute prep!
5. What’s the best way to serve Lobster Rolls?
For a classic presentation, serve your Lobster Rolls (East Coast Style) on a platter lined with fresh lettuce leaves. Add some lemon wedges on the side for a zesty touch. Pair them with potato chips or coleslaw for a complete meal that’s sure to impress!
Final Thoughts
Making Lobster Rolls (East Coast Style) is more than just preparing a meal; it’s about creating a moment of joy and connection. Whether you’re enjoying them on a sunny afternoon or serving them at a family gathering, these rolls bring a taste of the coast right to your kitchen. The combination of fresh lobster, creamy dressing, and toasted rolls is simply irresistible. Plus, they’re quick to whip up, making them perfect for busy days. So, gather your loved ones, dig in, and savor every delicious bite. Trust me, these rolls will become a cherished favorite in your home!
Print
Lobster Rolls (East Coast Style): Elevate Your Sandwich Game!
A delicious East Coast style lobster roll recipe that elevates your sandwich game with fresh lobster meat and creamy dressing.
- Total Time: 46 minutes
- Yield: 4 servings 1x
Ingredients
- 2 cups cooked lobster meat, diced
- 1/4 cup creamy mayonnaise
- 2 tablespoons freshly squeezed lemon juice
- 1 tablespoon whole grain mustard
- 1/4 teaspoon sea salt
- 1/4 teaspoon freshly ground black pepper
- 1/4 cup finely diced celery
- 4 soft New England-style rolls
- 2 tablespoons softened unsalted butter
- 1/4 cup finely chopped fresh chives (optional)
- Fresh lettuce leaves for serving (optional)
Instructions
- Mix the diced lobster meat with the mayonnaise, lemon juice, whole grain mustard, sea salt, black pepper, and diced celery in a large bowl. Stir carefully to ensure even distribution.
- Cover the bowl with a lid or plastic wrap and let it chill in the refrigerator for about 30 minutes to enhance the flavors.
- While the lobster mixture is cooling, heat a frying pan over medium heat and generously spread softened butter on the outer sides of each roll.
- Toast the rolls in the pan, turning occasionally, until golden and crispy, about 2-3 minutes on each side.
- After toasting, fill each roll generously with the chilled lobster mixture.
- For an extra touch, sprinkle with chopped chives and serve on a bed of fresh lettuce leaves if desired.
Notes
- For best flavor, allow the lobster mixture to chill for at least 30 minutes.
- Feel free to adjust the seasoning to taste.
- Chives are optional but add a nice flavor and color.
- Prep Time: 10 minutes
- Cook Time: 6 minutes
- Category: Sandwiches
- Method: Mixing and Toasting
- Cuisine: American
- Diet: Gluten Free
Nutrition
- Serving Size: 1 sandwich
- Calories: 450
- Sugar: 1g
- Sodium: 800mg
- Fat: 25g
- Saturated Fat: 5g
- Unsaturated Fat: 20g
- Trans Fat: 0g
- Carbohydrates: 30g
- Fiber: 2g
- Protein: 25g
- Cholesterol: 70mg