
Introduction to Jalapeño Popper Cheesy Chicken Enchiladas
Hey there, fellow home cooks! If you’re anything like me, you know that life can get pretty hectic, especially when you’re juggling family, work, and everything in between. That’s why I’m excited to share my recipe for Jalapeño Popper Cheesy Chicken Enchiladas—a dish that’s not only delicious but also a quick solution for those busy weeknights. Imagine creamy, cheesy goodness wrapped in soft tortillas, all topped with a zesty sauce. It’s the kind of meal that will impress your loved ones and leave them asking for seconds. Trust me, you’re going to love this one!
Why You’ll Love This Jalapeño Popper Cheesy Chicken Enchiladas
Let’s be honest—who doesn’t love a meal that’s both easy to make and bursting with flavor? These Jalapeño Popper Cheesy Chicken Enchiladas check all the boxes! They come together in just about 45 minutes, making them perfect for busy evenings. Plus, the creamy filling and cheesy topping create a comforting dish that feels like a warm hug. Your family will rave about them, and you’ll love how simple they are to whip up!
Ingredients for Jalapeño Popper Cheesy Chicken Enchiladas
Now, let’s dive into the delicious ingredients that make up these Jalapeño Popper Cheesy Chicken Enchiladas. Each one plays a vital role in creating that creamy, cheesy goodness we all crave. Here’s what you’ll need:
- Cooked, shredded chicken: This is the star of the show! You can use rotisserie chicken for a quick option or cook your own. It adds protein and heartiness to the dish.
- Cream cheese: This creamy delight gives the filling its rich texture. It melts beautifully and binds everything together. You can also use a low-fat version if you’re watching your calories.
- Shredded cheddar cheese: A classic choice that adds sharpness and flavor. Feel free to mix it up with a different cheese if you prefer—Monterey Jack works great too!
- Shredded Monterey Jack cheese: This cheese is mild and melts like a dream, making it perfect for enchiladas. It complements the cheddar beautifully.
- Diced jalapeños: Whether you choose fresh or pickled, these little guys bring the heat! Adjust the amount based on your spice tolerance. If you’re feeling adventurous, try adding more for an extra kick!
- Garlic powder: A must-have for flavor! It adds depth without the fuss of chopping fresh garlic.
- Onion powder: Similar to garlic powder, it enhances the overall taste without the tears. It’s a great shortcut for busy cooks.
- Cumin: This warm spice adds a hint of earthiness that pairs perfectly with the other flavors. It’s a staple in Mexican cuisine.
- Smoked paprika: This ingredient brings a subtle smokiness that elevates the dish. If you can’t find it, regular paprika will work in a pinch.
- Salt and black pepper: Essential for seasoning! Adjust to your taste, but don’t skip these—they really bring out the flavors.
- Flour tortillas: These are the cozy wraps for your filling. Small tortillas work best, but you can use larger ones if that’s what you have on hand.
- Enchilada sauce: This zesty sauce is the finishing touch! You can use store-bought or make your own if you’re feeling ambitious. It adds moisture and flavor to the dish.
- Fresh cilantro: A sprinkle of this herb adds a fresh pop of color and flavor. If you’re not a fan, feel free to skip it!
- Sour cream: This is perfect for serving on the side. It adds a cool, creamy contrast to the spicy enchiladas.
For exact measurements, check the bottom of the article where you can find everything listed for easy printing. Now that you know what goes into these delicious enchiladas, let’s get cooking!
How to Make Jalapeño Popper Cheesy Chicken Enchiladas
Now that we have all our ingredients ready, let’s dive into the fun part—making these Jalapeño Popper Cheesy Chicken Enchiladas! Follow these simple steps, and you’ll have a delicious meal on the table in no time.
Step 1: Preheat the Oven
First things first, preheat your oven to 350°F (175°C). This step is crucial for ensuring even cooking. While the oven warms up, you can get started on the filling!
Step 2: Prepare the Filling
In a large mixing bowl, combine the shredded chicken, cream cheese, cheddar cheese, Monterey Jack cheese, diced jalapeños, garlic powder, onion powder, cumin, smoked paprika, salt, and black pepper. Use a fork or spatula to blend everything together until it’s creamy and well mixed. This filling is where the magic happens, so make sure it’s nice and smooth!
Step 3: Assemble the Enchiladas
Grab a 9×13 inch baking dish and pour a small amount of enchilada sauce on the bottom. This will prevent the tortillas from sticking. Now, take a tortilla and spoon a generous amount of the chicken mixture into the center. Roll it up tightly, tucking in the sides as you go, and place it seam-side down in the baking dish. Repeat this process for the remaining tortillas and filling. It’s like wrapping little presents of cheesy goodness!
Step 4: Add Sauce and Cheese
Once all the enchiladas are snug in the baking dish, pour the remaining enchilada sauce evenly over the top. Don’t be shy—make sure every inch is covered! For an extra cheesy finish, sprinkle any leftover cheese over the sauce. Trust me, you can never have too much cheese!
Step 5: Bake
Cover the dish with aluminum foil and pop it in the oven for 20 minutes. This helps the enchiladas steam and get all cozy. After 20 minutes, remove the foil and bake for an additional 10-15 minutes. You’ll know they’re ready when the cheese is melted and bubbling with a beautiful golden hue. Your kitchen will smell heavenly!
Step 6: Garnish and Serve
Once out of the oven, let the dish rest for a few moments. This helps everything settle. Before serving, garnish with fresh cilantro for a pop of color and flavor. Serve warm with a dollop of sour cream on the side. Your family will be lining up for seconds, I promise!

Tips for Success
- Prep your ingredients ahead of time to save on cooking time during the week.
- Use rotisserie chicken for a quick and easy filling option.
- Don’t skip the resting time after baking; it helps the enchiladas hold their shape.
- Feel free to customize the spice level by adjusting the amount of jalapeños.
- For a creamier texture, add a splash of milk to the filling if it seems too thick.
Equipment Needed
- 9×13 inch baking dish: Essential for baking your enchiladas. A smaller dish works too, just adjust the number of tortillas.
- Mixing bowl: Any large bowl will do for combining your filling.
- Fork or spatula: Perfect for mixing the filling until creamy.
- Aluminum foil: Helps keep the enchiladas moist while baking.
Variations
- Vegetarian Option: Swap the shredded chicken for black beans or sautéed vegetables like bell peppers and zucchini for a hearty, meatless meal.
- Spicy Kick: For those who love heat, add diced fresh jalapeños or even a splash of hot sauce to the filling for an extra fiery flavor.
- Cheese Lovers: Mix in different types of cheese like pepper jack or gouda for a unique twist on the classic cheesy goodness.
- Gluten-Free: Use corn tortillas instead of flour to make these enchiladas gluten-free. Just be gentle when rolling them up, as they can be a bit more fragile.
- Low-Carb Version: Substitute the tortillas with thinly sliced zucchini or eggplant for a low-carb alternative that still delivers on flavor.
Serving Suggestions
- Fresh Salad: Pair your enchiladas with a crisp green salad topped with avocado and a light vinaigrette for a refreshing contrast.
- Rice or Quinoa: Serve with cilantro-lime rice or fluffy quinoa to soak up the delicious sauce.
- Drinks: A chilled glass of iced tea or a light beer complements the flavors beautifully.
- Presentation: Garnish with extra cilantro and lime wedges for a pop of color and zest!
FAQs about Jalapeño Popper Cheesy Chicken Enchiladas
Got questions about these Jalapeño Popper Cheesy Chicken Enchiladas? You’re not alone! Here are some common queries I’ve encountered, along with my answers to help you out.
1. Can I make Jalapeño Popper Cheesy Chicken Enchiladas ahead of time?
Absolutely! You can prepare the enchiladas and assemble them in the baking dish, then cover and refrigerate them for up to 24 hours before baking. Just add a few extra minutes to the baking time if they’re coming straight from the fridge.
2. What can I substitute for the chicken?
If you’re looking for a different protein or a vegetarian option, shredded beef, turkey, or even black beans work wonderfully. Just make sure to adjust the seasoning to match your chosen filling!
3. How spicy are these enchiladas?
The spice level really depends on the type of jalapeños you use. Fresh jalapeños will give you a nice kick, while pickled ones are milder. If you’re sensitive to spice, feel free to reduce the amount or skip them altogether!
4. Can I freeze Jalapeño Popper Cheesy Chicken Enchiladas?
Yes, you can! Just assemble the enchiladas, cover them tightly with foil, and freeze before baking. When you’re ready to enjoy them, thaw in the fridge overnight and bake as directed. They’ll taste just as delicious!
5. What’s the best way to reheat leftovers?
The best way to reheat your enchiladas is in the oven. Preheat to 350°F (175°C), cover with foil, and heat for about 15-20 minutes until warmed through. This keeps them nice and cheesy without drying them out!
Final Thoughts
Making Jalapeño Popper Cheesy Chicken Enchiladas is more than just cooking; it’s about creating a moment of joy for you and your loved ones. The creamy, cheesy filling wrapped in warm tortillas is like a hug on a plate, perfect for busy weeknights or special gatherings. I love how this dish brings everyone together, sparking laughter and conversation around the table. Plus, it’s so easy to customize, making it a go-to recipe for any occasion. So, roll up your sleeves, get cooking, and enjoy the deliciousness that awaits you!
Print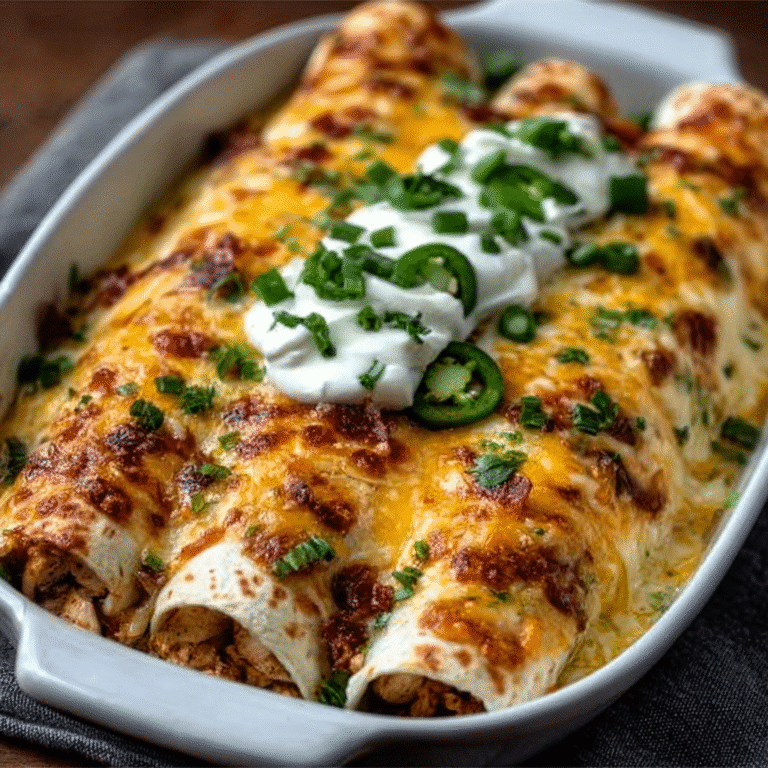
Jalapeño Popper Cheesy Chicken Enchiladas you’ll love!
Delicious and creamy Jalapeño Popper Cheesy Chicken Enchiladas that are perfect for any occasion.
- Total Time: 45 minutes
- Yield: 4 servings 1x
Ingredients
- 2 cups cooked, shredded chicken
- 1 cup cream cheese, softened
- 1 cup shredded cheddar cheese
- 1 cup shredded Monterey Jack cheese
- 1/2 cup diced jalapeños (fresh or pickled)
- 1 teaspoon garlic powder
- 1 teaspoon onion powder
- 1/2 teaspoon cumin
- 1/2 teaspoon smoked paprika
- 1/4 teaspoon salt
- 1/4 teaspoon black pepper
- 8 small flour tortillas
- 1 cup enchilada sauce
- 1/4 cup chopped fresh cilantro (for garnish)
- Sour cream (for serving)
Instructions
- Preheat your oven to 350°F (175°C).
- In a mixing bowl, blend together the shredded chicken, cream cheese, cheddar cheese, Monterey Jack cheese, diced jalapeños, garlic powder, onion powder, cumin, smoked paprika, salt, and black pepper until creamy and well blended.
- Pour a small amount of enchilada sauce on the bottom of a 9×13 inch baking dish.
- Lay out a tortilla and spoon a generous amount of the chicken mixture into the center, then roll it up tightly and place it seam-side down in the baking dish.
- Repeat the process for the remaining tortillas and filling.
- Pour the remaining enchilada sauce evenly over the top of the arranged tortillas.
- Sprinkle any leftover cheese over the sauce for an extra cheesy finish.
- Cover the dish with aluminum foil and bake for 20 minutes.
- Remove the foil and bake for an additional 10-15 minutes, until the cheese is melted and bubbling with a golden hue.
- Let the dish rest for a few moments before garnishing with fresh cilantro and serving warm with a dollop of sour cream on the side.
Notes
- For a spicier version, use fresh jalapeños instead of pickled.
- Feel free to add more cheese on top for extra cheesiness.
- These enchiladas can be made ahead of time and stored in the refrigerator before baking.
- Prep Time: 15 minutes
- Cook Time: 30 minutes
- Category: Main Dish
- Method: Baking
- Cuisine: Mexican
- Diet: Gluten Free
Nutrition
- Serving Size: 1 enchilada
- Calories: 450
- Sugar: 2g
- Sodium: 800mg
- Fat: 25g
- Saturated Fat: 12g
- Unsaturated Fat: 8g
- Trans Fat: 0g
- Carbohydrates: 30g
- Fiber: 2g
- Protein: 30g
- Cholesterol: 90mg